
This is something I’ve wanted to write about for a long time, but was always defeated by the enormity of the subject- consumed by having so much to say that I couldn’t fit all that I wanted to condensed into one post. So rather than trying to cram everything into one, I’m going to break this into three parts. The first serving as an introduction to long exposures, while the second will dive deeper into tips and tricks to elevate your long exposures, and the third will highlight specific scenarios on assignments when I used long exposures. It’s my hope that this post will inspire you to make some long exposures of your own!

A lot of our time as photographers is spent fiddling with camera settings to make an image that relatively matches what our eyes see. Long exposures have the ability to turn the tables by showing us the world in a way our eyes naturally cannot. They have the power to turn a bland setting into one that is vibrant and beautiful, bringing out colors and details that otherwise would go unnoticed. Whether it’s cities and landscapes at blue hour, fireworks and lightning, people, or the starry sky and the milky way-long exposures can help you do it all.


So, what is a long exposure? Summed up simply, a long exposure is what you call a picture that is taken with the shutter open for an extended period of time, and the possibilities for what can come out of it are about as limitless as your imagination. So, why would we ever want to shoot with a slow shutter speed like 5 seconds, 10 seconds, a minute, half an hour or longer? Because it allows us to shoot and see things that otherwise would be impossible. So what happens with a long exposure? Think of a slow/long shutter speed such as 10 seconds. With a long exposure, taking a ten second long photo on your camera is basically like taking a 10 second long video and compressing everything that ten second video recorded into one frame. It’s how we’re able to capture so many subjects that would otherwise not be possible to photograph.
What you will need:
1. A camera that is capable of manual settings for changing shutter speeds.
2. A tripod to stabilize your camera: to make sure it won’t shake while you are taking these long exposures, because anything longer than 1/5 of a second handheld is going to start to get blurry. *If you don’t have a tripod, not to worry. You can use anything around you that is stable that you can press against or set the camera on.
Camera Settings:
Shoot Raw: jpgs are small files because they throw away a lot of shadow, midtone and highlight details that you need to tone your image. when shooting long exposures, it’s often (though not always) that what you see on your camera screen is not the true image that’s really there. For starters, your camera screen cannot render a raw image-what you’re seeing is a jpg preview of it even when you shoot raw. Just as the landscape photographer Ansel Adams expressed what he described as photographing with the mind’s eye to capture the image you ultimately want to produce, you take photos with the settings that make it possible to bring out the image you really have taken later when toning it with whatever your preferred editing software is.

Take this image of the New River Gorge in West Virginia for example. The image coming straight out of the camera looks dark to the point of being completely unusable-but all of that shadow detail is still retained in the raw file. That is because raw files with low ISO retain an incredible amount of detail in them. Just look at the resulting image when the exposure and shadow details are raised.
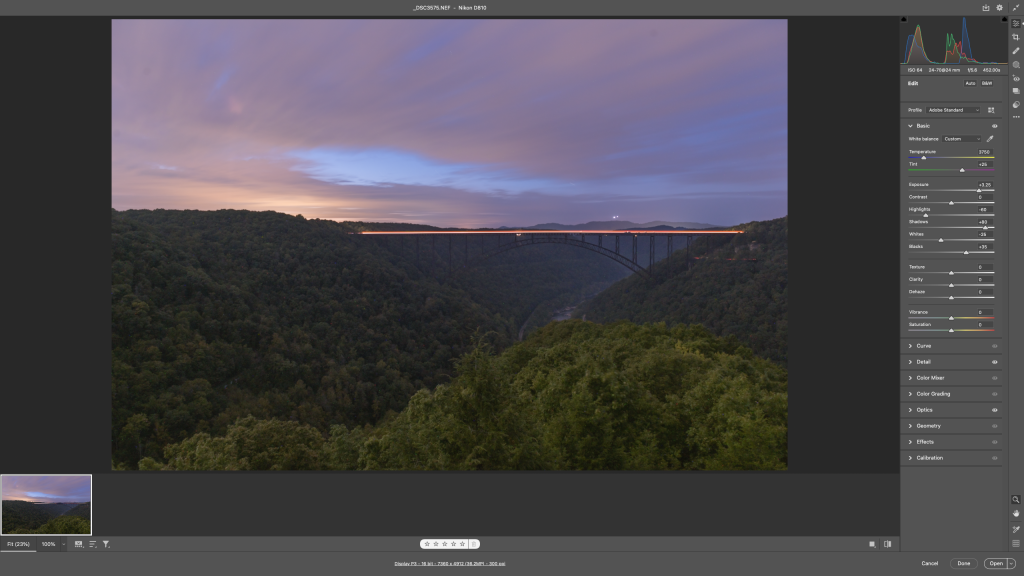
That is the power of dynamic range in nearly all of today’s cameras. There is also another reason why this method is the best for shooting long exposures-balancing the contrasting light sources of any given image. I could have jacked up my ISO and got the gorge itself appropriately lit, but the fading light on the horizon, which is prominently brighter than the rest of the image, would most likely be blown out. So shooting with the right settings that allow you to control the varying elements of light in your frame is absolutely key to ultimately producing a balanced image that is a faithful representation of the scene as you saw it yourself.

three factors determine how a photo turns out-shutter speed, aperture and ISO. Let’s go over each one and how they’ll affect your long exposure images.
ISO: The most important thing to note about ISO when it comes to long exposures is this-the lower your ISO, the greater your dynamic range- the shadows, midtones and highlights in your images. Using a high ISO is going to limit your ability to tone your image; as the level of noise picked up is going to make itself more known the more you edit it. Whereas if you’re shooting at a very low ISO, you’ll be able to bring out an incredibly lit and detailed image out of a frame in whatever editing software you use that will possess little to no noise so you’ll have a well lit and clean long exposure. However, some subjects will necessitate shooting at a higher iso in order to capture a sufficient amount of light-such as the Milky Way below.

Shutter speed: Your shutter speed is going to be determined by a couple of factors-how long can your exposure be before your image is overexposed, and what varying factors you are trying to capture in an image. For example-when trying to get movement of people, only a couple seconds is typically necessary-unless they happen to be moving very slowly. If you’re trying to get a lot of light trails collected on a road or highway, then you’re going to have to set your exposure long enough for the light trails to collect.

Aperture: This will largely depend on your subject matter. For example, when it comes to lightning or fireworks, because aperture has a direct correlation with the intensity of light, the more open or closed your aperture is, the thinner or bolder light streaks of everything from fireworks and lightning bolts to light trails will appear in the image. Keeping a very closed aperture will help control your highlights and keep them from blowing out-especially when taking images such as the above when the amount of light from passing cars builds up very quickly.

Set picture settings to neutral.
Especially important if you are compelled to shoot in jpg, camera companies assume that people like saturated and contrasty photos, setting their defaults to a jpg standard that amplifies these qualities. To somewhat override this, set your picture controls to neutral. Jpg format automatically throws away tonal information in your images in order to create smaller files, so setting your camera to neutral makes sure that you’re throwing away the least amount of tonal data as possible.
Turn off image stabilization: If you’re shooting with a mirrorless camera or a long lens with built in stabilization, chances are that you have it set to on by default. If shooting on a tripod longer than a couple seconds, the image stabilization can potentially interfere with your exposure. Just turn it off.
Use self timer to reduce camera shake: If you’re taking a non-handheld long exposure, then a minimal amount of movement like the vibration on the camera as you press the shutter can be enough to show up in your resulting frame-especially if you’re shooting long exposures with a long lens. While cable releases are still around, they’re not as common as they used to be. A decent workaround is to turn the self timer on your camera. This will ensure minimal to no camera shake and a sharp image.
Easy way to focus in the dark: Focus peaking is a common feature in most mirrorless cameras now, showing up as lines on your screen to show you what is at maximum focus in your frame when shooting in manual focusing mode (which, if it’s particularly dark you’re probably going to be doing anyway). Besides that and pointing your camera autofocus sensor point to a distant light source that it can pick up on such as a star (which usually works but not always) my preferred method is to crank up my ISO very high to take a shorter long exposure, and use that as a gauge to achieve the right focus and change the settings back to what you actually want for the image once you have it.


At the base of Mount Shasta in Northern California, it was as dark as you could possibly imagine-a moonless, light pollution-less pitch black night. I couldn’t see anything in front of me beyond the car lights, let alone the mountain. Setting the lens focus to infinity and cranking up the ISO to shoot for a little short of a minute and a half allowed me to adjust the focus just right before taking the exposure I wanted with the mountain and North Star overhead.
How Long Exposures impact landscapes.

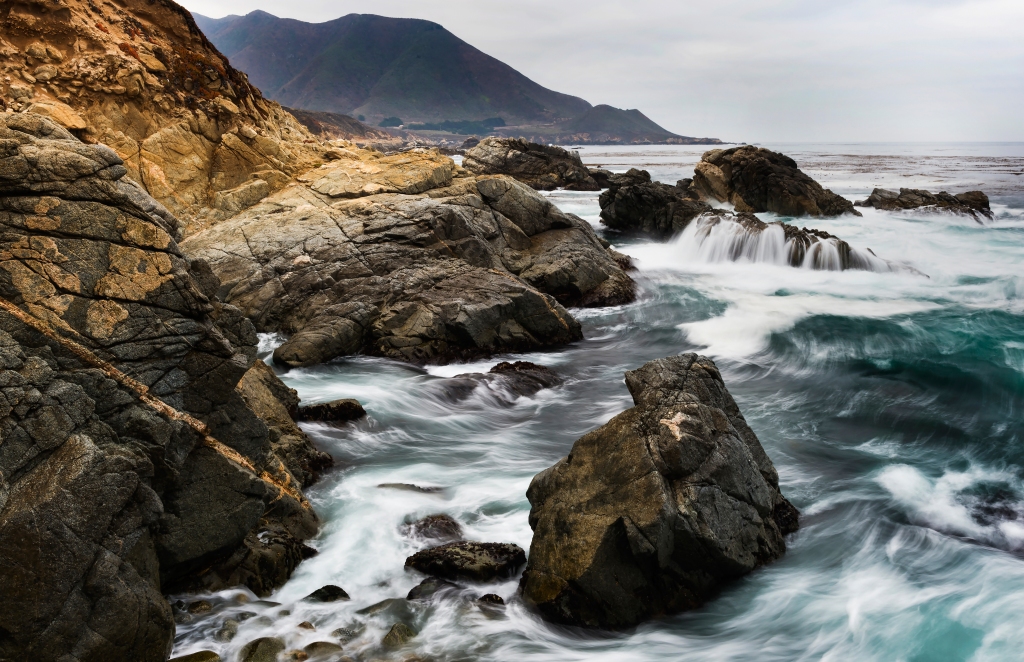
Growing up on the West Coast, the beach was where I first started experimenting with long exposures. Any place with water is a good place to start experimenting with long exposures, as it’s a subject in which changes to the shutter will show an obvious difference. Shooting at normal shutter speeds, water is frozen in place and retains its texture, but with using long exposure, dragging the shutter even a fraction of a second elongates and smoothes out whatever churning water you’re photographing. Make the exposure long enough on even a tumultuous body of water, and it will take on a glassy, flattened appearance.


Note the difference between the two images above, taken at the same area of Point Lobos on the central coast of California. The photo on the left still maintains the texture of the churning waves at 2 seconds, but at 30 seconds (with the assistance of a 10-stop neutral density {ND} filter to shoot such an exposure during the day) the water is flattened and smoothed out.


There are many subjects that will be affected by whatever you set your shutter speed to be-such as stars. Just look at the difference between the two exposures below.


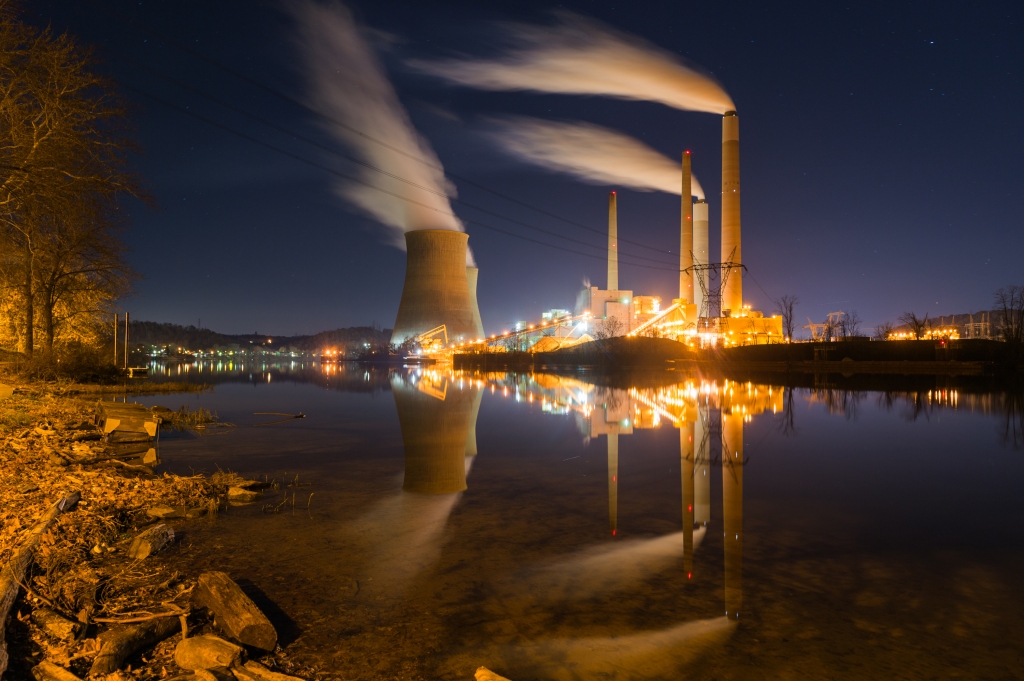
Shooting a relatively fast shutter, the exhaust coming from out of the John Amos power plant below still retains its texture as we see it with our own eyes. However, a proper long exposure will elongate and smooth it out.

This is how fog photos in famed areas such as the Marin headlands in the Bay Area are taken. As fog rolls over the landscape, a long exposure will give it that definitive wavy and smooth texture.

Fog also absorbs not just light but the colors of whatever light sources there are around as well. Just as passing fog captured the light from an oncoming car and the colored lights from a nearby property, fog rolling over Buenos Aires took on the lights surrounding el obelisko.


Cityscapes and light streaks.

It was around 2009 that I took my tripod to SF for the first time and made my first long exposures of the skyline from Twin Peaks. I would return there and to my personal favorite view from the nearby Corona Heights many times, and as I learned proper exposure and toning I was able to finesse my cityscapes. It was in San Francisco that I learned about things like blue hour, light streaks and properly toning my photos.


A common theme that almost all of these photos have is that they were taken around blue hour; the hour after sunset and the hour before sunrise. The reason is because instead of having to deal with the deep contrasts of night, blue hour offers the window of time where the sky and the surrounding landscape are equal to each other, creating a more balanced image as a result. Atop that, the colors of blue hour bring the most out of city and landscapes-blues, purples, reds and even greens make their appearance. Many of the pictures you see of cities and landscapes are taken in those two crucial hours of the day.


The two photos above of Harpers Ferry were taken 41 minutes from each other-that’s how quickly the light changes in that period of transition when day to turns to night.


Blue hour is ultimately the best time possible to bring the maximum amount of light and color to your sense of place images. Note the difference between the above images of the Greenbrier resort taken during the day vs the later part of blue hour, and note the balance of light between the foreground and background of the West Virginia state fair or the Buenos Aires skyline-images that would be much flatter if they had been taken around another time such as midday.
Sometimes, long exposures can also come in handy to show the lack of movement of life in general. At the very beginning of the pandemic in March 2020, I spent some time taking long exposures of popular areas in DC that would normally be filled with cars and people on the weekends as a means of recording the uniqueness of that moment in time.


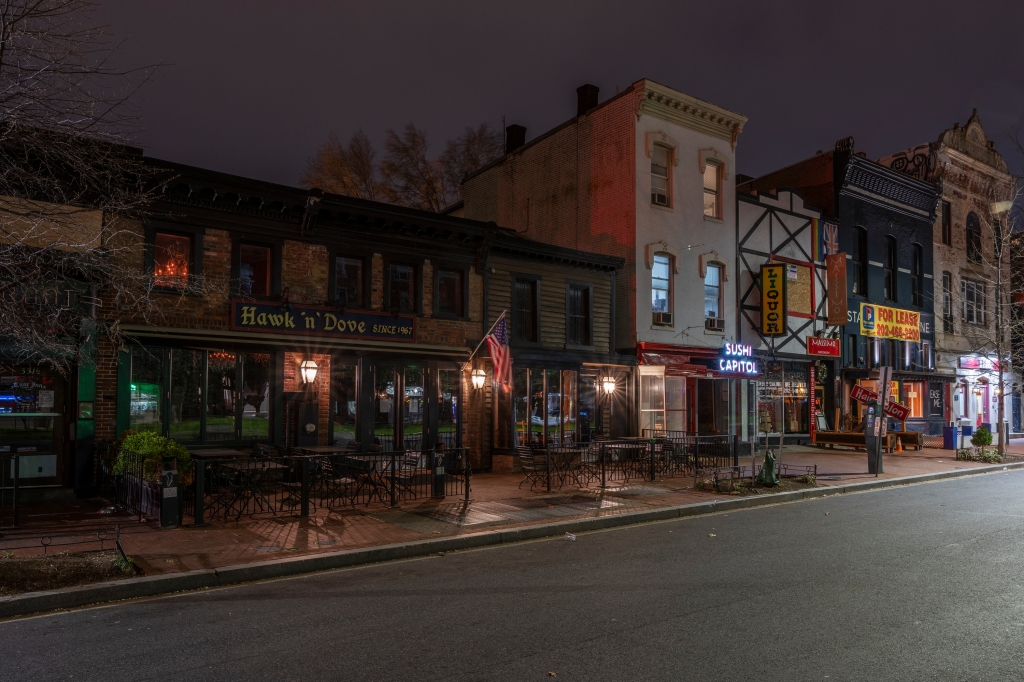


Long exposures can also be informative in showing how well trafficked an area is in the form of light streaks, which is also an easy way to add light, color and movement to an otherwise static image.


in Arlington, VA on January 07, 2022.
So how is it that we can catch the lights but not see the cars themselves? Think about when you’re driving on a road and a car passes you going in the opposite direction. The driver is moving too fast for you to process them with your eyes, and the car itself is just a blur as it passes. It’s the same principle with long exposures. The lights are picked up because they are bright enough to be picked up by the camera, whereas the car itself is moving too fast to be picked up on its own-so we’re left with just the lights.

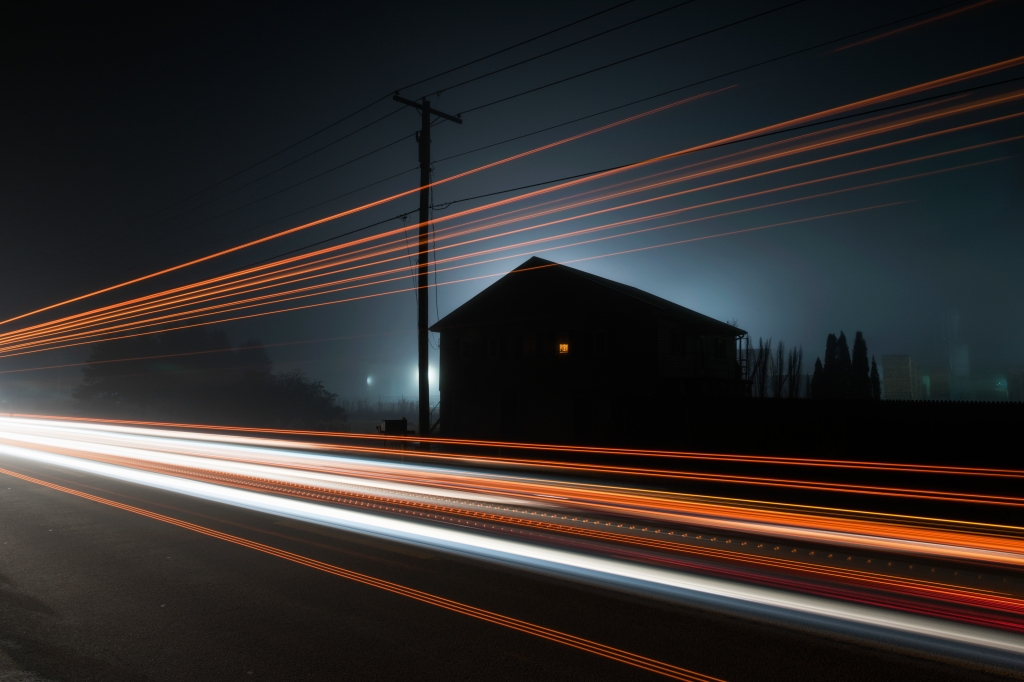
For the above image in West Virginia, I was parked on the side of the road from a house that had a single light on. I intentionally underexposed the photo to try to match the spooky feel of what was a very foggy night-but the shot wasn’t quite there yet. Walking a few paces along the road, I positioned the bright streetlight behind the house to frame it, and waited for a semi truck to move past which would give me additional light streaks that would properly frame the house.


The longer your shutter speed, the more streaks you’ll collect, but be careful not to get so many that your highlights become blown out. Shooting from a vantage point or off to the side is most ideal, as your lens won’t be hit head on by the brightness of the headlights and blow out your photos.
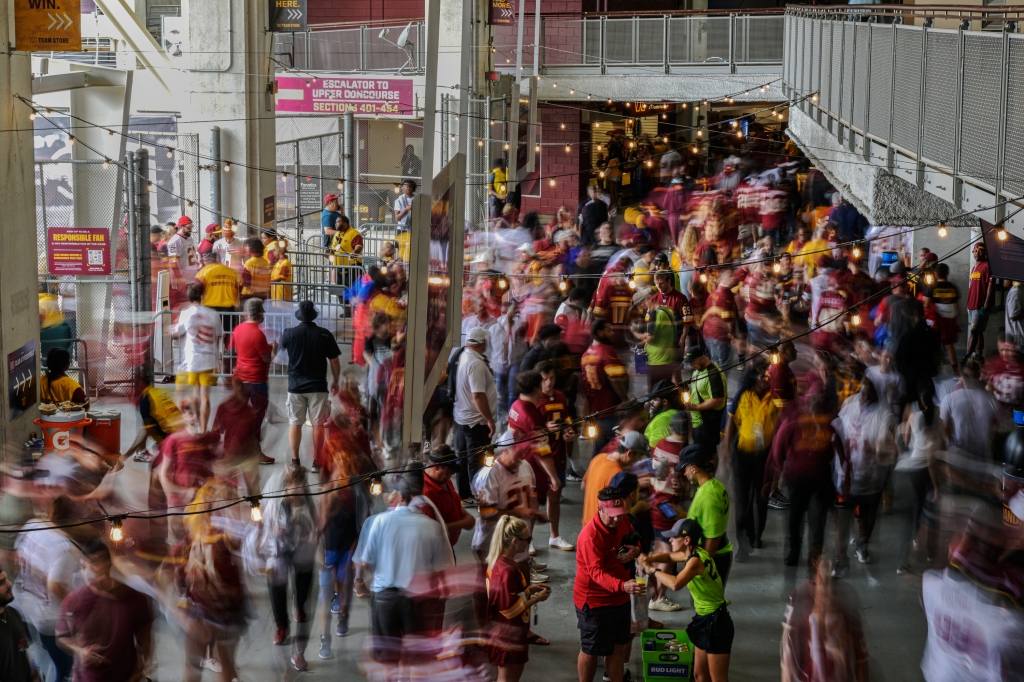
Capturing motion with people


Long exposures don’t have to just be used to make normally boring city or landscape images more interesting. Motion can be used to convey fluid movement or to emphasize stationary subjects as others move around them. When it comes to photographing people in motion, you can best determine the optimal shutter speed by how fast or slow people are moving, which is usually determined by how densely packed your scene is. For example, the images above in front of the Supreme Court and inside the House chamber are respectively 20 seconds and 13 seconds. If the area was not nearly as packed and people were able to move quickly, then those shutter speeds would be far too long to the point that no one would be picked up by the camera. But because people are moving very slowly, you can get away with a longer shutter speed. The inverse is then true if someone or a group is moving quickly-even half a second or slightly faster will give them that blur effect.


Dragging the shutter. Long exposures don’t always have to be “long”. Dragging the shutter is a way to get the same effect but quickly and handheld. The below left image was taken while sitting in the House chamber after Kevin McCarthy had been confirmed as Speaker. At that point, we had spent multiple days in the chamber through multiple rounds of votes-each one taking hours at a time as the vote count was done one by one by voice vote in a chamber of 435 representatives. So at that point I was just trying to make something visually different. leaning my camera over the railing and putting the shutter at 1/5 of a second, I kept the camera still for the first fraction before quickly jerking it to the left and kept the camera still in the last fraction of the exposure to get the doubled effect. A similar idea applied to my photo of Senator Bernie Sanders. By keeping the camera still the first fraction of the exposure and then barrel rolling the camera for the remaining exposure I was able to get the desired tunnel effect; as when barrel rolling the center of the image will typically remain more still than the surrounding edges displaying the most movement. It’s important to note again the difference between the two images, in that if you freeze your camera movement in the last fraction of the exposure, you’ll get a doubling effect, whereas if you don’t stop it and just keep moving then you’ll get a fluid motion.


In the above images such as the race or the capitol rotunda, the shoes are frozen because for a fraction of time the shoes are stationary between steps, whereas the rest of the subjects bodies are in fluid motion.
No Tripod? No Problem! The whole world’s your tripod.


Ideally, you’ll have your camera on a sturdy tripod when taking your long exposures, and for certain subjects such as stars or fireworks, a tripod is a must. That being said, and let’s be honest; carrying around a tripod sucks. they’re usually heavy, cumbersome and take up a lot of space. So I understand anyone who would be less than thrilled to carry one with them throughout an assignment. But even if you find yourself without one, it’s pretty easy to stabilize your camera enough by holding it tight against an object or placing it on the ground and angling the lens with something underneath to get the photo you’re trying to. Especially now that the image stabilization is so good in most mirrorless cameras, it’s not difficult to take a 1, 2, 3 or longer exposure just holding your camera against something. All of the above photos were taken without a tripod -instead just by balancing the camera on a ledge, placing it on the ground, or pressing it up against something, like a bust of President Kennedy’s head for that shot at the Kennedy Center, or a windmill art sculpture in the middle of the street for that shot in Baltimore. For the shot of the Chicago skyline, I angled my camera on a backpack on the ground. Articles of clothing like a jacket are also a good stabilizing source. These are all good times to use the self timer of your camera as previously mentioned, allowing you to keep the camera still as it makes the exposure.
This is the end of part one. For part two, I’ll be diving into more detail about shooting certain subjects such as lightning, fireworks, stars and more-as well as utilizing different elements such as introducing flash or other external light to your long exposures, using ND filters, using the moon as an additional light source and other tips. I hope this has been a good primer on long exposures thus far and look forward to sharing more with you!
